Chronic Ear Infections
Chronic ear infections in dogs commonly develop as a result of an underlying medical (or conformational) condition. It is important to identify and address the condition to successfully manage the ear infection. Your veterinarian will recommend testing to help determine the cause if ear infections are recurring in your dog.
These conditions can include:
Cytology of the discharge in the ear is necessary to determine the cause of the infection. Infections can be caused by bacteria (cocci or rods) or by yeast. Knowing the cause of the infection allows your veterinarian to choose the proper medication to treat it. Ear infections can change over time--just because the last 3 ear infections have been caused by yeast doesn't mean this one isn't a bacteria. Don't try treating this at home--rely on the expertise of your veterinarian to address the issue. A persistent bacterial infection (or a severe one caused by rods) may require a culture, as these can develop resistance to topical medications and require some creativity in treatment on the part of your vet.
These conditions can include:
- Allergies (Food, Environmental)
- Low thyroid levels
- Disorders of Keratinization of the skin (as in cocker spaniels)
- Floppy-eared breeds
Cytology of the discharge in the ear is necessary to determine the cause of the infection. Infections can be caused by bacteria (cocci or rods) or by yeast. Knowing the cause of the infection allows your veterinarian to choose the proper medication to treat it. Ear infections can change over time--just because the last 3 ear infections have been caused by yeast doesn't mean this one isn't a bacteria. Don't try treating this at home--rely on the expertise of your veterinarian to address the issue. A persistent bacterial infection (or a severe one caused by rods) may require a culture, as these can develop resistance to topical medications and require some creativity in treatment on the part of your vet.
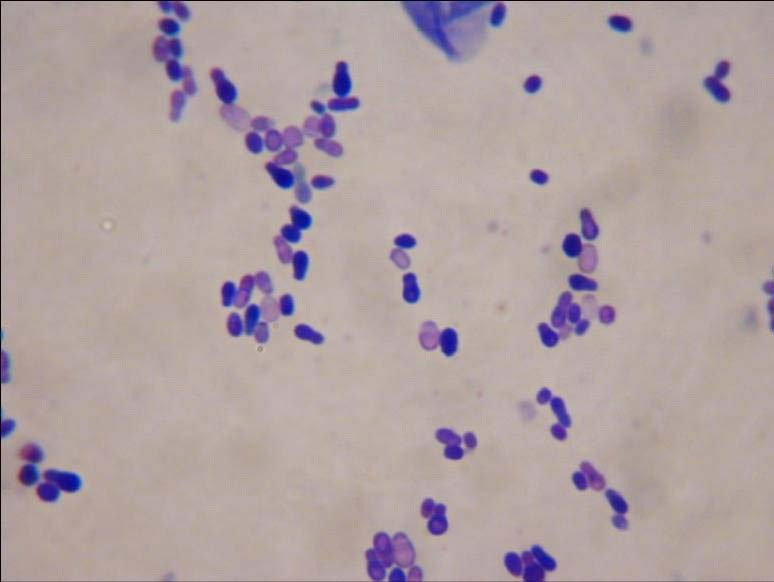
Yeast |
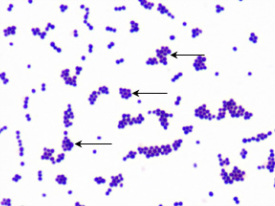
Cocci |
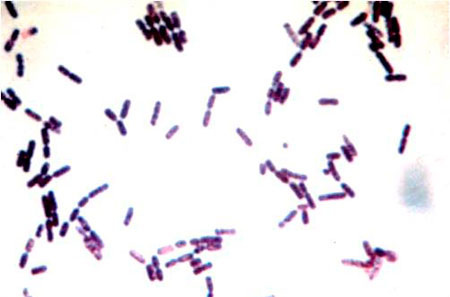
Rods |
One of the most important parts of the process in treating your dog's ear infection is recheck appointments with your vet! It may seem obvious to you at home whether the ears look clean, and you will be able to note when your dog stops bothering his or her ears, but this does not mean that the infection has resolved.
Many "new" ear infections are actually ear infections that have returned because they were never completely resolved!
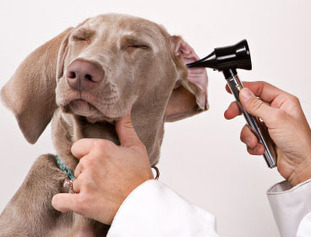
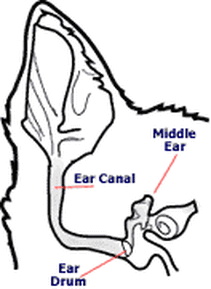
The reason it can be difficult to tell if your dog's ear infection is gone is due to the unique anatomy of the ear canal. It makes an "L" shape, which prevents you from being able to see all the way down into the canal. Your veterinarian can do this with the aid of a special cone-shaped device with a light called an otoscope. It may not be possible to do this without sedation or until treatment has begun if your pet is extremely painful.
Many "new" ear infections are actually ear infections that have returned because they were never completely resolved!
The reason it can be difficult to tell if your dog's ear infection is gone is due to the unique anatomy of the ear canal. It makes an "L" shape, which prevents you from being able to see all the way down into the canal. Your veterinarian can do this with the aid of a special cone-shaped device with a light called an otoscope. It may not be possible to do this without sedation or until treatment has begun if your pet is extremely painful.
Cleaning the Ears
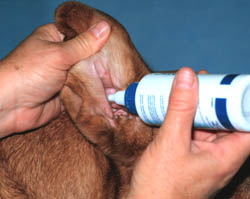
Always follow your veterinarian's advice regarding cleaning and treatment of your dog's ears. I put together this step-by-step guide to show you what has worked best for me when cleaning my own dog's ears. Please use it, if it is helpful to you, only if it is approved by your vet.
Flush a generous amount of cleaning solution into the ear(s). Let it overflow!
You want it to fill the entire canal to help loosen all the wax and debris adhered to the walls of the canal.
Gently massage the base of your dog's ear.
This will help to loosen the debris inside.
You will hear a "gooshing" noise from the cleaning solution inside the ear canal.
Most dogs enjoy this part of the process!
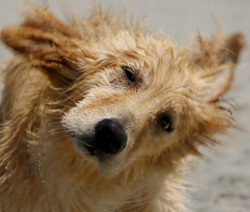
Allow your dog to shake his head.
Stand back--this can get messy! Weather permitting, it's a good outdoor activity. Otherwise, try the bathroom or kitchen where clean up is easier.
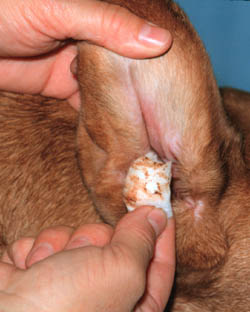
Wipe out the canal with cotton by inserting the cotton into the ear canal and massaging it from the outside. When you remove it, you'll find that the debris adheres right to the cotton!
Don't be afraid to put the cotton down into the canal--you won't lose it! Roll cotton (in the first aid section of the drug store) works well in larger dogs if jumbo cotton balls don't seem big enough.
Avoid using gauze or paper towels, as they can be rough on the sensitive tissue on the inside of the ear canal.
Q-tips should only ever be used on the external part of the ear--do not insert them into the ear canal! You could end up pushing debris further into the ear or potentially damaging the ear drum.

Wait about 15 - 20 minutes after cleaning before applying any ear medications. Apply medications using the amount, frequency, method, and duration as prescribed by your vet.
This will ensure that your dog has stopped shaking his head for the most part, and more of the medication will remain in the ear canal. Also, some ear cleaners are designed to break down the cell walls of tough bacteria (Triz EDTA cleaners) to allow medications to become more effective and they need time to work before medications are applied.
Massage the base of the ear a second time to distribute the medication into the deep canal.

Remember to make an appointment and have a recheck examination with your veterinarian in the recommended time frame (usually 2 - 3 weeks)!